Steps to implement successful student technology projects

The learning that takes place during the process of completing a technology project is just as, if not more, important than the presentation of the final product. As educators, we know that “it’s the process, not the product,” but showing and sharing their final product with the audience is often what engages students the most.
Completing successful projects with students follows several basic steps, many of which you probably already use. Implementing each of these steps with students helps to ensure successful student technology projects. You can use these guidelines to help you and your students through the process.
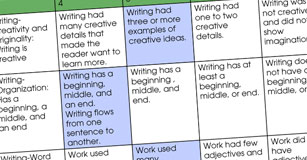
Before students begin working, you need to articulate your expectations for student behavior, quality of information, and work during the entire process. Begin by sharing the project goals and the task the students will complete. Give the students a project timeline as you explain the steps in the process, and clarify how long students will be working on each step. Let students know what type of products they can create to meet the project goals. Showcase the tools you can provide to help them complete the project and define your standards for behavior during the project building process. Give students checklists and rubrics for the project to help them understand your expectations for their work during the project.
Show your students examples of high-quality completed work to clarify product expectations and prompt new ideas. You may already have examples of previous projects your students have created, or you may be able to find examples online or on CDs showcasing the winners of various student contests.
Remember trying collaborative group work in your classroom? It worked great one time and was a disaster the next. There is no perfect team and certainly no one way to group students. A team’s success in completing a project is not solely dependent upon the academic capability of its members. The key is to define your goals for the project and teach the students how to identify how they are interacting, enabling them to self-correct. Make it clear to the students that cooperation and teamwork are an essential part of their project assessment.
Successful collaboration on a project involves free and direct communication, support for all team members, and recognition of the value of each member’s contribution to project success. Based on your knowledge of student strengths, weaknesses, and diversity, form teams of students that include varying levels of expertise, ability, and skills. This fosters positive interdependence and accountability, creates a richer pool of knowledge, and provides benefits for both low and high achievers.
You might also want to choose specific roles for various team members. You can assign a role to each student or let the students assign roles within the group. Roles help solidify the value of each member’s contribution, and, in the case of large projects, help a team meet project requirements. Understanding each student’s work style will help also you facilitate a team’s formation, conflict resolution, and project completion.
Once foundational information has been provided, expectations have been established, and teams formed, the students are usually ready to jump in and start working. Before heading directly to the product, be sure to move them through a strong planning process. You should be open to changes and new ideas during the process, but planning helps students more effectively utilize classroom time. The planning process progresses from large to small, wide to narrow. Beginning with as many ideas as possible, students need to explore where their project can go (brainstorm), where they think it should go (vision), and how they are going to get there (storyboard).
The project-building process moves from bigger to smaller, wider to narrower. Brainstorming helps students make the beginning of their project as big as possible. During a brainstorming session, students should verbalize or write down everything that comes to mind to open up the project to ALL the possibilities. Only when there are sufficient ideas should students begin assessing the ideas presented for feasibility and relevance to the essential question.
Before students can choose a direction, they need to begin developing foundational knowledge about the topic. You can help your students develop knowledge in a range of ways, such as direct instruction, research, experts, and fieldwork. Have students organize the information using graphic organizers, so they are ready to explore themes and ideas through in-depth project work.

This initial knowledge building should help students begin to focus on their approach to answering their projects essential question. Have student articulate a vision for project work that reiterates project goals, clearly explains the goal of their work, and describes how the solution addresses the audience that will be viewing or using it. A clearly articulated vision helps the students move in the right direction.
Create a Graphic Organizer
Need a thought web, timeline, flowchart, or other graphic organizer for a lesson?
CreateNext, each team creates a plan for accomplishing their project. The project plan should provide a road map for how the students will achieve their vision for their project. This detailed planning process helps to ensure that everyone in the group is in agreement on content and direction. You may choose to approve the plan before creative and technological work can begin.
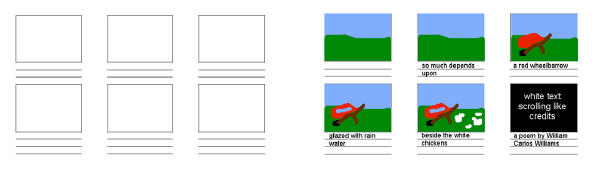
This could be done as a storyboard that includes content and a strong direction for each portion of the project. A storyboard is a constant reminder of your goal, keeping you motivated. It can also save you hours of editing and can prevent students from creating information they aren’t going to use.
Once the storyboard is complete, students should create a management plan for completing the project. After reviewing their strengths and weaknesses, they should assign specific tasks to each team member and begin gathering the research and media necessary to complete their project.
Once the materials have been gathered and the research completed, teams are ready to begin assembling the pieces of the project. As they are building their projects, you, as a facilitator and coach, support “just in time” learning as needed by each team. Be sure that you facilitate work and provide support from the back of the classroom, not the front.
When student teams think they are finished, have them review the project rubric to make sure their work meets the expectations for the project. They should complete the rubric as an assessor or even have another student or project facilitator evaluate the project. After receiving feedback on their draft, each team should work on fixing problems with research, content, design, and navigation. Once again, when they think they are finished, they should review the rubric to ensure their work meets the expectations for the project.
Each team now formally presents their project. This can be done in many ways, including an oral presentation, small group discussion, peer-to-peer review, submission to an expert, or even in a mini-trade show or conference.
The most effective projects involve the creation of something of value to someone outside of the classroom. This makes it easier to find an appropriate place to share student work. If you are creating public service announcements, see if your local access cable channel will air them. If students are creating original works of art, see if they can be displayed at a local coffee shop. Creating brochures or interpretive materials for a historical site should be distributed at the site, or site’s web site.
In addition to demonstrating the product they created, students should share their learning during the project. As part of the coaching model, promote growth by asking clarifying and open-ended questions that will further group discussion and response. Each student presenting should share what they learned about the subject matter content; technical skills needed; planning, organizing, and implementing a project; how they learned; and how their group functioned.
Give feedback on the project. This can be in the form of individual responses and audience thoughts based upon what the group has already mentioned. Highlight key concepts and issues that are part of the learning process for this project. Write down the issues identified during the sharing process in a place that everyone can refer to when forming their own reflections and feedback. The audience should give feedback on the project content and delivery. The instructor should share insights into the learning that occurred as the team completed the project-building process.
Assessing technology projects involves both a summative assessment of the final product and a formative assessment of the learning and skills demonstrated during the project-building process. If you are looking for artifacts to assess during the process, you can evaluate:
You may also want to have students keep notebooks or journals to help you identify the process learning.
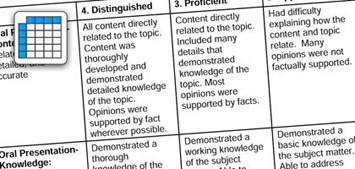
The project rubric will guide your summative assessment of the final product and remove the feeling of subjectivity from the grading process. You may also want to ask students to use the rubric to grade their own project and process work or the work of their peers, or complete a more open-ended self-evaluation on their contributions and learning.
Once the student presentations are finished and you are moving on to the next topic in your curriculum, remember to assess the success of the project as a learning opportunity. Even if every product isn’t a complete success, many positive learning moments occur during the process. Learning is a journey, not a destination. Facilitating a project, acting as a guide, and showing students how to learn rather than merely dispensing knowledge all demonstrate a model of how students can approach new ideas, information, and problems. Providing students with skills for metacognition and self-direction will help improve their learning in all areas of the curriculum as well as in all facets of life beyond the classroom.


Creative Educator can help you bring project-based learning to your school.
Learn MoreFive ideas for creative classroom centers
Creative, digital book reviews
Fun and powerful ideas with animated characters
Wixie
Share your ideas, imagination, and understanding through writing, art, voice, and video.
Rubric Maker
Create custom rubrics for your classroom.

Pics4Learning
A curated, copyright-friendly image library that is safe and free for education.
Wriddle
Write, record, and illustrate a sentence.
Get creative classroom ideas delivered straight to your inbox once a month.
Topics